Tuesday, 30 April 2019
Adjusted Crystal Cove Cami
I did make some adjustments. The cami actually has a nice overlapping back detail which could be very cool on summer, but I wanted a solid back so I just reflected the piece around centre back. I also wanted to replicate the ogden's low front and back, so I lowered the front by about an inch and the back by about 1.5 for a fabulous low back. I also didnt use bias straps, as I didnt have enough material so I just cut longer straight ones. I also reduced the depth of the facing as one of pet hates is facings that pinch round the bust.
I used the last remnant of the gorgeous viscose I used for my Peacock dress, and it fit so nicely! I LOVE THIS TOP! I was concerned that it might not work, and I did have to take little darts out under the arms, but otherwise it is perfect! The low back just skims the top of my bra, and I feel very glamorous! My bra straps are completely visible, but personally I quite like that look.
Saturday, 27 April 2019
Bonn shirts
Cue 5 or so years later and I've made one shirt. Which doesn't fit any more.
Until now! I decided (probably on a whim, that's how most of my sewing gets done!) that I wanted a loose blousy shirt to tuck into things. I scoured the Internet for a suitable pattern - a key criteria was built in cup sizes - I know myself and I just can't be bothered with fbas! I also didnt need many traditional shirt details, as I wanted a simpler style. I decided on the Bonn shirt from Itch to stitch, which has a simple collar and sleeves. It's reasonably slimline but a tester had made a softer blousey one so I was sold!
I used this black and white viscose (probably from my eBay viscose buying spree) which is perfect as it's not too soft and creasy.
I made the size up through the waist and bust, to keep it blousey. I went for the three quarter sleeves to keep it useful for varying temperatures.
I hate buttonholes, and it easily goes over my head so I just sewed short lines where the buttons would go instead. I left off the top fastening as it felt higher than I wanted, and also some of the lower ones so that I can tie up the bottom if I want to.
I love this shirt - I've worn it several times a week since making it. It's a work staple but also makes me feel slightly more fashionable than usual!
I therefore immediately made another - this time with a pink flowery viscose that I had considered for my sister's asaka robe but on reflection I thought might be too bright for her tastes. I got it from Samuel Taylor in Leeds and as I needed a lot for the robe (there are some huge sleeves involved!) I had masses left over. I therefore made a matching skirt that I can wear with the top so it looks like a dress. Overall I am extremely pleased with the various pieces!
Monday, 18 June 2018
Grecian turquoise - the ultimate secret pyjamas!
Saturday, 3 March 2018
Blue and red Appleton
In the classic blogger manner, I sewed up a pattern, loved it, wore it all the time, made another, and am now blogging the second one without having done the first!
So, aaages ago, probably a year and a half ago? I made myself a black velvet Appleton dress by Cashmerette. I love fitted stretchy dress, and a wrap, and it is therefore perhaps not that surprising that I have worn it repeatedly since I made it.
I have not yet got round to photographing it, partly as I am lazy and partly as it is hard to photograph due to being black.
I have been stockpiling fabrics ever since to make another one (or twelve!). I've been in a bit of a sewing slump though so I have only now got round to starting them.
This is a soft jersey I got from Leeds market a few months ago - I loved the colours so much it jumped the queue!
The colours are so vivid and it doesn't start looking white until you stretch it quite significantly, which is always important in a jersey fabric.
As everyone else has already said- the Appleton is a great pattern, and is super quick to make. This probably took me about two hours, a decent proprioception of which was ironing my scrunched up pattern pieces. The construction is very straightforward, and makes it a lovely easy sew.
As it's a wrap dress, and Jenny has already done your fba for you, fitting is also pretty minimal. I only made two alterations. As I had with my back dress, I added 2.5 inches onto the bodice length (I'm 5'9" but most of my height is in my torso). I also slightly lowered the back neckline by about 1cm - on my black dress the neck rides up a bit.
So - I love this dress - sadly though I haven't got to wear it for reals yet as the UK's been having a drastic snowstorm this week so it's been too cold.
Tuesday, 27 February 2018
Whistlestop wardrobe for India
Other than that though they worked very well, though I'm not sure how much I'll wear them in the uk- perhaps if I took the crotch back up?
Sunday, 12 November 2017
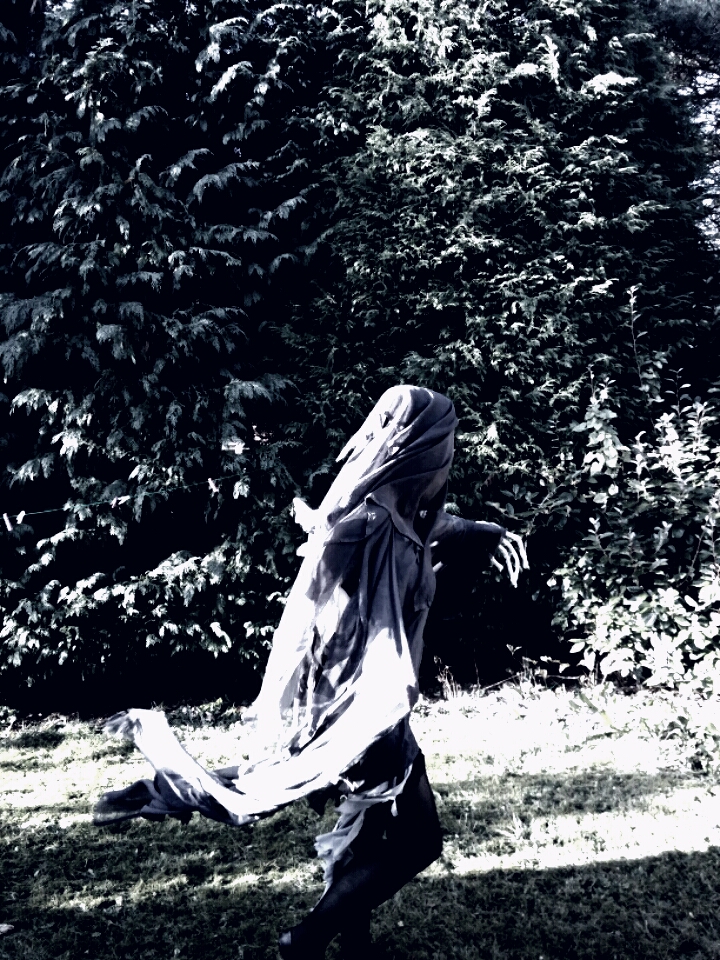
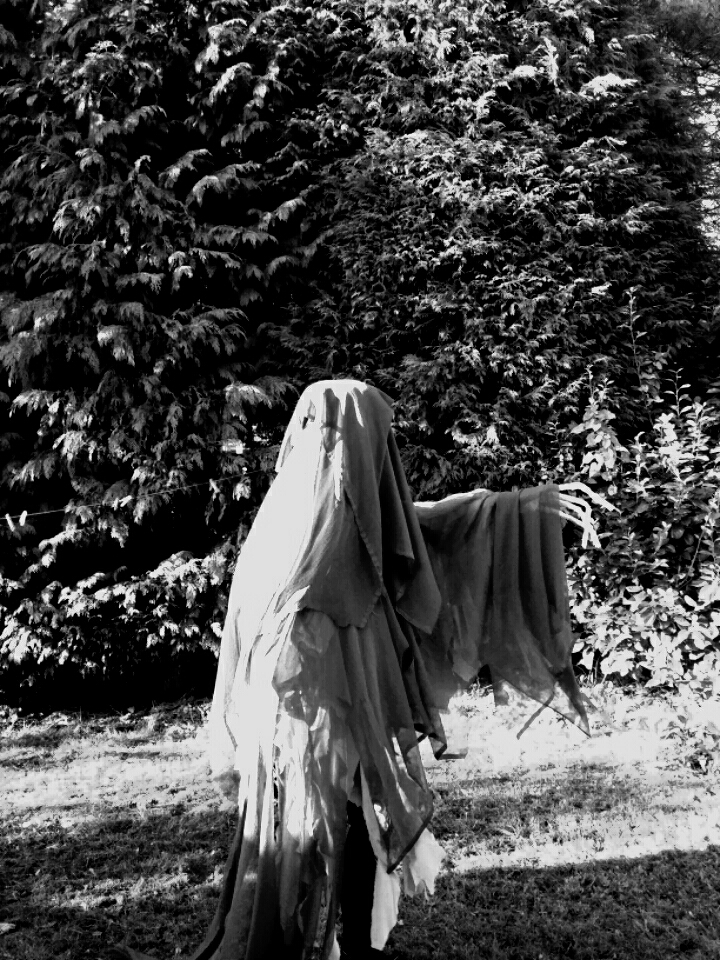
"Fancy a kiss?" The Dementor costume
This costume has been 2 years coming. The halloween before last I had big plans to be a dementor. It was me and my girlfriend's first halloween together and we had spent a lot of time discussing costumes. Cut to the night of the party and due to bad teaching times I am exhausted, antisocial and have made about 5% of the costume. Eventually we go out late with me wearing an old red riding hood cape and a serious case of costume anticlimax.
But... the dementor costume was still haunting me. Just too creepy to forget.
So this year I started slightly earlier and actually planned some stuff. I was still making it up to the wire, but I was cheerful and finished it (part due to planning and perhaps part no longer being a teacher!)
It's actually a pretty simple costume. I made a series of layers and ragged the edges. They just have a hole in the middle and the longer ones have holes for my hands to go through. To make it creepier I made a hat from cardboard with a dome of pillow in the middle. This extended my head height by about 5 inches, and I then added another 2 layers of thin material. Which looked extremely creepy and I could just about still see.
To complete the effect, I made some finger extensions using those costume witch fingers, long bits of wire and some electrical tape. These proved quite uncomfortable (I think the costume fingers were for kids) and I could only manage one hand at a time, but they looked great!
Overall the costume was a great success and I won second prize at the party!
Monday, 18 September 2017
The "Baby I'm a firework" Upton hack
Now I am trying to be thrifty and I have a stash that fills 8 large drawers, so I was determined to work with something I already had. As I had had some slippage issues with my wiggly viscose in the last dress, I decided to use a more stable fabric. This significantly cut down my options, as most of my stable fabric selection is 1-1.5m lengths intended for pencil skirts. The fabric that therefore jumped out at me is one of my oldest stash pieces, 3m of thin cotton with a crazy flower/firework print. I must have bought this a good 4-5 years ago in Edinburgh. I had intended it for a fitted dress, but then learned more about fabric and realised that it was a bit flimsy and creasy. It then sat in the stash... waiting..
Until now! (Pardon the wrinkles, I had already been to the ceremony and meal.)
Now, as I mentioned in a recent Instagram, I always sew in a bit of a rush, but can spend hours planning, so I originally had something very complicated planned. I have always loved tiki sarong dresses, and had a whole boned and pleated top, wrap skirt thing planned. As is typical with my planning however, I planned so long that I had no time to make it, so I scaled my plan right back.
Now previously, I have only made the Cashmerette Appleton wrap dress (which I have still not blogged despite LOVING!) and I was a little concerned that a woven top would be harder to fit, even when designed by the talented Jenny. This assumption meant that when the pattern piece slipped slightly when cutting out the bodice that I didn't fix it, I figured I would need to make adjustments anyway. I WAS WRONG - I SHOULD HAVE TRUSTED JENNY! Once it was all sewn up, the fit was perfect, except very slightly too wide across the centre front, where it had slipped. Sigh.
To reinforce the bodice given the thin material, I underlined the bodice with white cotton from a second hand sheet. This was really convenient, as I could draw straight onto it with my heat dissolving pens to make all the markings. (I love my those pens!) I should have also reinforced the skirt, but did not for time reasons. This wasn't a critical error, but meant that there was a slight rip later that could have been avoided.
I tried quite hard to make sure the print worked and wasn't odd. I carefully lined up one of the bright explosion areas onto the neckline which was very successful I also did some pattern matching up the centre back seams, but then had to let it out as it was too tight.. still, it still reads as one image, even if isn't perfect!
For the Upton bodice I made a 14 e/f and the only alterations I made were to lengthen the straps by 1.5 inches (I basically sewed along the cut line), take in the upper back by about half an inch along the zip, and to lengthen the bodice by about 3 inches to lower the waistline (the Upton sits at the high waist). I also had to add a short dart at the centre front to lose that pesky additional width.