Wednesday 21 December 2016

On stashes....


Talk to a sewist, and you will talk about THE STASH. It is a strange topic really, as it is both an emblem of pride, of identity, of potential, but also of failure, guilt and waste. On one hand, we collect fabric to give ourselves options, to express ourselves. We see endless options and dreams and we get all excited. On the other hand however, we often collect more fabric than we use, so it sits there, reminding us of all the dreams we had, all the plans we made. Now don't get me wrong, not all sewists build up stashes at all (you efficient people slightly terrify me!) and many others love their stashes, viewing them as a fabric shop in their own home. I don't though, and based on my wanderings on the interwebs, a lot of other sewists don't either.

If I see some fabric I love, I want to own it. It eats at me, "BUY ME , BUY ME! I would be so perfect for a .....". Sometimes I buy it, sometimes I don't. But the stash grows. I don't sew nearly as much as I think I do, and so the stash keeps creeping up, overflowing another box in my spare wardrobe, another bag on the floor of my sewing room. Drip, by drip, by drip. Even when I have used a piece, there's some left, a bit too big to throw away,; so into another bag it goes.. I might need to repair it, I might want to contrast line a pocket, or make a cushion cover...

I love the pieces of fabric in my stash, I have a plan for each, touching them thrills my fingers and looking at the colours and patterns makes my eyes happy. I love the potential of it all, that I could whip up anything I wanted in a weekend - screw shopping! I feel like a sewist in my room, looking at it all, it is evidence of this aspect of my identity, of the community I belong to.

It troubles me though. It sits there, taking up space, requiring organisation, gathering dust. And I can see the money invested in it. The ideas I had that I haven't put into practice. As you go further back, the identities I had that no longer really apply, but which I am still attached to. It is full of memories, and not necessarily pleasant ones, memories of enthusiasm for things that never ended up happening.

The trouble is that I approach buying fabric the way I buy clothes - I see that, I want it, I possibly buy it. And clothes also costs money, and take up space, and you get weirdly nostalgic about them. But the key difference is that you can at least wear the clothes. I actually have to use the fabric for it to help me. It is like I am thirsty, so I keep buying drinks, but instead of drinking them and feeling relieved, I just put them in a cupboard, and keep being thirsty.

I had a moment of realisation earlier (and hence this post). I was looking at my fabric options form the stash on Trello (this has been a very useful app for me btw), thinking of some things I could make over Christmas. And I realised that the idea of making things with my stash bothered me. I was worried about using the fabric. Worried that I would waste it, that I wouldn't have it later in case I needed it then. Which is utterly ludicrous. What is the point of having it if I don't use it? That's what it is for! What weird fabric emergency am I an anticipating that I need to keep half a fabric shop in reserve?! 

So I am going to use it. Make things with it as quickly as I can, experiment, give bits away, sell some. Make it an active thing again, not just a museum.


How though? so I have some plans:

1) Make some stuff. Motivation is a muscle they say, the more you sew, the more you want to. I am going to make some stuff over Christmas, some new stuff that is making me excited now, and some old stuff that got me excited before. 

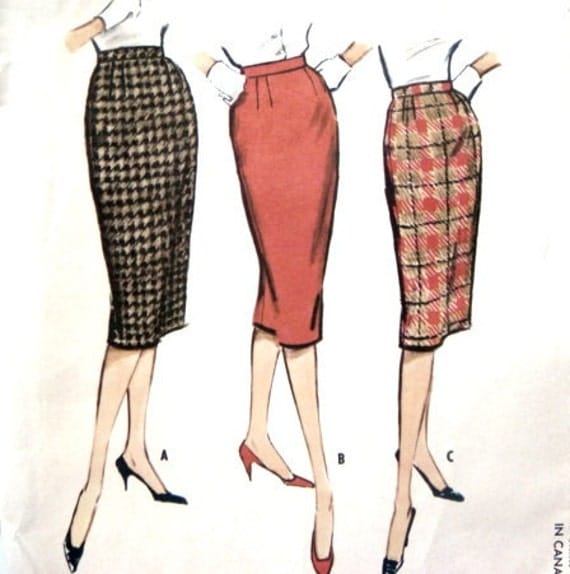
2) Tear up old plans. This is a big one for me. When I look at pieces of fabric I have had for YEARS, I still see the original plan for it. That might be a great plan, but frankly often it isn't. Who I am, what I wear, has moved on, and my understanding of what fabric would be good for (based on quality, fabric type etc) has drastically changed. So I look at some soft cotton and think: "I should make this into a lovely pencil skirt -why have I not done this yet. I am a failure, I should place it here in this pile where I will see it and make the skirt soon." But I don't make it, because I know really that it wont make a good pencil skirt, it will be see-through, and crease, and annoy me. So I don't make it. But I still remember the plan, the dream, so it stays in the stash. It is time to stop this. I am going to look at every piece I have, and really think about that dream plan. If it is rubbish, I abandon it. I shall abandon it by either making a new plan that might actually work, or getting rid of it. I need to write over all my old plans. It is bad enough having good ideas you haven't yet got round to, it's ridiculous to beat myself up over stupid plans!

3) Get rid of fear. Probably easier said than done this one! When I started sewing I sewed more. I had no idea what was hard, or shouldn't be attempted. I consequently sewed all kinds of stuff, with mixed results. Now I am scared, I know slippery fabrics are hard to work with, I know wool is expensive and can shrink weird. About a quarter of my stash is fabrics I am too scared to use - put away for "when I am a better sewist". I am probably never going to be much better. And when I am I will just know more things I can be scared of - that is the nature of knowledge. The only thing that makes you braver is trying. So I am going to try. I am going to commit to ruining fabric and making wonky things again. Because I probably wont. And if I do, it is no more a waste than them waiting forever. 

Thursday 1 December 2016

Using the high bust measurement for more accurate bodices.

I posted this over at the Curvy Sewing Collective's Facebook group, and thought I might as well stick it on here too.

A major problem that people have who are not a B/C cup is that patterns use full bust measurements to judge how big a bodice you should make. The bodice, at every size, is proportioned for a B/C cup lady, so if you pick the size that fits you and you have a larger or smaller bust then it will end up the wrong size as it is based on a different shape. The easiest way to get the right proportions thorough your shoulders, neck and back is to use your high bust measurement.


The diagram above shows two ladies with the same size bodies but different size boobs. Both ladies need a pattern with the same size shoulders, back and upper chest, but the E cup lady can't work out what size that is from her full bust as it will all come out too big, as the bigger bust size is just larger all over.

On the E cup diagram the lower red line is showing the measurement to the full bust of the B/C cup lady, so that you can see it is basically the same as the measurement of the high bust (the top red line) of the E cup lady. Using this measurement, the E cup lady can start with the size that fits her upper body apart from her boobs, then just do a FBA to add in extra boob space at the front.

Whilst this shows the general idea! (I hope), when measuring yourself, you don't have to have the tape on a crazy diagonal as in the picture, as your back gets a bit wider as you go up and it's wider where your arms attach, which compensates. Just measure where it is comfortable to do so, it shouldn't make that much difference, and should certainly be a better fit that using your full bust!

This should also work if you are smaller busted, you just do a Small Bust Adjustment afterwards instead.

Sunday 30 October 2016

Those poor unfortunate souls! The Ursula costume


I love Halloween, and dressing up generally, I love the planning and thinking and working bits out. I was really annoyed with myself last year as I was a bit under the weather and tired and so had a hissy fit and just reused a costume. This year I was determined to do better!

I always find it had to decide on what I want to be. I am not a Halloween purist who thinks you have to dress up scary, but I do like my Halloween costumes to have some creepy element, or have some connection with death. Previous costumes have included Cruella deVille, a weeping angel and dead Amelia Earheart (I used to have blog posts about these but I removed a lot of material when I trained to be a teacher - Sorry!). This year I eventually decided on Ursula from the Little Mermaid, as she is excellently evil! I always think she gets a bad rep, she should totally have won, Ariel is a bit useless!


So.. to the costume! I decided right away that I wanted actual tentacles. Lots of the costumes online are a bit lacking in this respect, often with flat ones or teeny ones. There are also some amazing cosplays with enormous tentacles, but I wasn't going to be standing in a big empty convention centre so mine were going to have to be more practical! I was going to a semi-crowded pub so my costume needed to be squashable, not trail on the floor, not too hard to sit in and possible to use the toilet!

Now another key issue, as a fairly well endowed lady, I do not ever wear strapless bras. They just don't work, they are uncomfortable, need tugging up all the time and just look rubbish on me. But Ursula is very strapless. I decided to experiment -  I read somewhere that bustiers are better for the larger busted, but I couldn't find any size appropriate ones easily to hand. I instead compromised, and got a cheap corset from Amazon and wore it with a strapless bra, so the corset bits held me up. I wasn't sure if this would work but it did brilliantly! I didn't lace it that tight so it was actually very comfortable, and I never had to worry about the strapless bra at all! Frankly it was a revelation - I won't be wearing it under a summer top of anything but it would be great for formal wear. Here is Agnetha wearing it - its fits me better as Agnetha doesn't squash like I do!


I went round a bit on the plan for the skirt and tentacles, but eventually ended up with a series of layers.

I have to confess with slight shame as a sewist that the top didn't really involve any sewing at all. I ruched the front a bit with some elastic, but then I basically made a rectangle of t-shirting and just wrapped it round and pinned it at the front with a safety pin. I then just tucked it in to the corset at the back. I was going to hand sew it but when I put it on it worked fine so I just left it.


The next layer was a long, full skirt. I made it out of very thin slippy poly cotton. It's extremely full, and when I first tried it on I kept dancing round the flat like a Disney princess as it was very swooshy. BUT NO - I am not a princess, I am a villainess! I was going to gather it onto elastic but it was too full, so I sewed it on every couple of inches instead; as it is an underlayer it didn't matter that it wasn't all joined on. Conveniently, the width from selvedge to selvedge was exactly right for my height so I didn't have to sew it. (You may be sensing a theme, there is surprisingly little sewing involved in this costume!)


So, the tentacles... This had me scratching my head for a bit, but after some excessive googling I decided on stuffed tentacles, attached to a waistband. They tentacles are made of half black pvc, and half purple sequin. (I got all the fabrics from Leeds market.) I had to add another layer of black t-shirting under the purple as it turned out a bit see-through and you could see the stuffing. I just cut out long triangles that were rounded at one end. I made the purple sections slightly narrower so the black would curve round more. Once I had sewed each side, I added some medium thickness green garden wire, just bent into a long v shape. I tacked this into the seam every 6 inches or so. I then stuffed them with old pillow innards, it took 3 pillows. I then sewed the open ends up, using a longer section of the underneath (so the end was sort of squared off 3-dimensionally).


I needed to be able to take the tentacles off, so I wanted them to be separate from the rest of the costume. I decided to sew them onto a wide elastic waistband. This worked well, but was a bit tricky to do, as the tentacles got in the way once I had sewed a few on! Not the straightest sewing I have ever done, but it worked. I then used clear fishing line to pull them up at the front. I left the back not pulled up as they are easier to squash and were more flexible that way.


To cover the waist join and made it all a bit dressier I then cut a short circle skirt of weird black sparkly material (it's like a flat tinsel, close up it looks like woven binbags) and popped it over the top.


My hair and makeup were fantastically done by the lovely Vee Hartley - she did an amazing job! She also made my shell necklace from Fimo. Here she is showing some more excellent makeup work as Cleopatra.


Overall I absolutely loved it! I got loads of compliments and the dress is enormously fun to wear. I thought, what with the corset and tentacles, that it might be difficult to wear for long. It was actually really comfy and the fun to swish!


(I hadn't finished my arm makeup here!)


As I finished it quite late, the light wasn't great for pictures so I put it all on again (minus makeup) for more detailed photos in daylight today. I really enjoy wearing it - would it be weird to wear it to work?


via GIPHY

Wednesday 1 June 2016

Summer rain Lady Skater


So this dress has been a long time in the making. Probably about 3 or 4 years. After meeting the charming kitschy-coo at the Crafter's Ceilidh back in the day I purchased some lovely raindrop print jersey from her shop (stop by- she has a great selection now too!). I always intended to make it into a Lady Skater - but I was always too chicken because I liked the fabric too much!


So... years pass and I eventually decide to cut in! Of course then I realise that I only bought a meter and a half... Sigh.  Cue the most fiddly and time consuming piece layout jigsaw I've ever attempted!  It took about 2 hours and at the end I had all my pieces and a remarkably tiny amount of scraps- this dress ended up almost zero waste! I did have to piece the sleeves and back waistband but otherwise perfect! Here are the remains!


Once cut out it was very straightforward - the pattern goes together very easily. I was a little worried it would be too tight and too short, and I didn't have any extra fabric to extend, but I needn't have worried. I added an inch to each side bust area and it was all fine. The dress is super comfy and relaxed, though perhaps a little mad due to the raindrops! It still needs hemming but I'm at my parents and forgot to bring the hemming tape!


I also managed the best neck binding in my history - its not perfect, but it lies properly flat and hugs my upper chest - Result!


Thanks as before to my lovely photographer (ie my sister with time on her hands!) who coaxed some half decent facial expressions out of me (let's forget about the 30 or so photos that did not make the cut due to my inexplicable face pulling!). Also thanks to my mother, who's gardening skills have really paid off!


Tuesday 31 May 2016

The weekend of binding begins...

So, stretch binding isn't really my thing. I've only managed two tops with bound necks that were remotely wearable, and one of them only works because the top is so slouchy! 
This weekend however I made / altered a number of things, most of which involved  stretch binding. I can't say I'm a pro now unfortunately - the last thing I made has ground to an unfinished halt after a few too many binding ****ups! But my technique has improved substantially. 


Item 1 - recutting a neckline in a scuba dress.

I found this rtw dress and loved the pattern and fit. The neckline however I was underwhelmed by. I tend to avoid high neck things to avoid the dreaded 'shelf boob', and while this isn't too bad for that, it's a little sportier looking than I like on me. (I am not sporty - a few years ago I took a quiz on the BBC website where you put in your age and general athleticism and it suggested the perfect Olympic sport for you - I got lawn bowls.)


I cut in a lower scoop neck (luckily the scuba meant it wasn't going to misshape). I then thought I'd have a go with some fold-over elastic I'd ordered after everyone on the Internet talked about it all the time.

Now fold-over elastic is easy to use. Of course that does require you to use it properly. ... I did no research and plowed in. Do not try to insert it in one go. It doesn't work. At all. Look at this mess.


I did some googling (and cursing), and realised I should have sewed it on the back first, and used a zig zag. I cut off the previous effort (screw seam ripping!) And tried again. Much better! It is lucky I was using scuba though as a softer knit would probably not have been recoverable so easily!


Tuesday 26 April 2016

Peacock (D)ruyere

Well I did it – I have completed the thing I always wanted to do but never have previously managed – I made something that fit, kept the pattern in a useable and understandable state and then made another thing using it without faffing about! Yeah! Unprecedented. Which is very silly given the dramas I have fitting things.


I took my Bruyere shirt pattern and made it into a dress! (Apologies for the creases -I had been wearing it!) The dress part was easy enough –I just lengthened the bottom section and added in extra width to the skirt so that it would fit over my hips properly. To make it a bit different on top I lowered the front and back neckline into deep scoops and took off the sleeves. I again dodged the buttonholes (my machine has been playing up and also, I just hate doing buttonholes!) and instead added on my new bright blue snaps.


It’s very comfortable dress to wear, I again used some lovely eBay rayon, this time from here, in this fabulous peacock print. I made no attempt to match as the pattern is massive and a sort of border print with a repeat so giant I couldn’t really spot it.  I did try and avoid any massive peacock print mishaps with pattern placement but I didn’t quite manage it –though the massive print across the bust is much less obvious in person.


In fact, that’s basically the story of the whole dress – I foresaw several problems and took steps to avoid them, and yet they all still seem to have snuck in anyway (though presumably less than they would otherwise have! So close! Just like the print issue however they all look way worse in the photos than in real life! (Oh unforgiving cameras! Anyone else like a project less once they’d photographed it?

I know from previous experience that if you drastically scoop out a neckline you get massive neckline/armpit gaping (not entirely sure why.. but is a definitely a general principle). I therefore rotated the straps in a bit on the front and back to stop this – I clearly did not do this enough though so at some point I’ll put in some darts which will hopefully help reduce the gap and strap slippage.

I feared that the skirt might hang a bit flat with the inverted box pleats. It does. I ironed the pleats quite a long way down and I don’t think this helped. It will probably look better when they've relaxed a bit. It looks much better in real life though as it moves quite nicely.


I also feared that my press on snaps wouldn’t go through the extra thick bits of the placket, and they didn’t, but I bodged that by sewing large snaps on the inside (with extras at the key gap spots) and then glued snap parts onto the front at those places so it looks like each one is a normal snap. This worked well.

Overall I like it – it’s very cool and comfy to wear and though the neckline is a bit gapey it’s also very flattering. I see myself getting a lot of wear out of this in the summer. I am also very pleased that for the first time ever I sewed up a bodice from a pattern and it fit perfectly (neckline aside obs!). I shall adjust the strappy pattern and put it aside carefully!


(In other news - I obviously didn’t have my lovely paparazzi sister to take these pictures and I couldn’t find my camera or tripod so I did it myself using my phone and a complex web of tape and pins stuck to the shoulder of my dress form! Worked pretty well! I am especially pleased with the burst function on my new phone camera app that I can set to take 10 pictures in a row, one every 2 seconds – really takes the stress out of photos without a remote). 

Tuesday 19 April 2016

Fitting clues


One of the hardest things about sewing is working out how to fit yourself- but it's also the most rewarding -and often the reason we started in the first place! As a beginner though it is very hard to know where to start. There is a wealth of tutorials out there for every fitting dilemma, but without knowing what you are googling its harder to find them.

I have therefore made a diagram with many of the common fitting changes on it. Obviously I haven't included everything - but I hope I've got most of them (let me know if you think any obvious ones are missing!). I have also not included any links (except to the insanely thorough pants fitting guide by Colette patterns which is amazingly detailed and I know nothing about pant fitting myself!) as everyone finds different resources helpful and I certainly haven't seen the whole internet!

I've done it by body area, and generally stuck to things which wouldn't automatically require you to just make a different size -though I have pointed this out as an option in some places. For each problem I have just listed possible solutions -obviously you need to look at your body and google stuff and see which one is likely to help you.

I hope this is helpful!

(EDIT -for some reason the image isn't coming up on mobiles-probably too big, so click through to the full page if you want to see it or here.)


Monday 4 April 2016

Check out the "pins" on this lady!

It's only been a bajillion years since I made Agentha (my dressmakers dummy) (see here and here for the how to) and since then she's been attached to an extremely wobbly lamp stand. This meant that she kept falling over backwards and sideways - not entirely helpful! She also had stuffing falling out from having to wedge her on the lamp (which led to some impertinent remarks from my mother!). In addition -she was a good 5 inches shorter than me - not helpful for hems.

So I finally got round to giving her legs! (Well one leg!) It's a simple metal coatstand - only I attached the hooky bits upside down.  Somewhat magically it's exactly the right height and hooked perfectly into her neck so she needs no stuffing at all! She's now super stable, very light and perfect! She looks somewhat wonky in the picture - sadly that's because I am! Nothing like blog photos to show you how uneven your shoulders are!

Friday 25 March 2016

First Swallows of Summer Bruyere shirt


Attention all -  I LOVE this shirt! It is by far my favourite thing I have ever made! It makes me feel super summery (especially combined with the fact the sun shone today) and also slightly like a waitress in a 50s beach bar, which I like.

As I said in an earlier post, I never find shirts that fit, and yet am too chicken to make them. Enter the Bruyere by Deer and Doe, a shirt with slightly more curves and character than your average work wear staple and hopefully easier to fit with less emphasis on bajillions of perfect button holes. 


Now some places call this pattern intermediate, and some advanced... eek! However I can safely say that the vast a majority of it is perfectly straightforward. I cheated a little as I skipped the long sleeves and cuffs, instead going for short sleeves with cut on cuffs. I have never made a shirt before, and collars and stuff are new, but it all worked out ok luckily! 


First up - the absolute star of this shirt is the fabric. I had a revelation a while ago that if I made shirts out of viscose (rayon to you yanks) I wouldn't immediately sweat straight through them. I therefore did some internet searching, and came across this stunning blue, cream and pink swallow fabric on Ebay (still some available here if anyone wants any). It's very drapey and was a little fiddly to cut but hangs and presses be-au-tifully. I bought it and was so keen to have a shirt made of it I used it for the first go at the pattern which I felt was bold -but successful! I only bought 2m rather than the 2.5/3 they suggest but as I shortened the sleeves this was fine. I made no attempt whatsoever to pattern match as it was such a bit and complex pattern but I did make sure I wasn't going to have any weird combinations/placement. 


I'm trying to stick to the theory about not being negative in these posts and its surprisingly hard, as there are a lot of flaws- but amazingly basically none are visible! yay! 


I did a "me" FBA, basically cutting it a bit big and then pinning it on Agnetha. I did however use this excellent post in the Curvy Sewing Collective about how to rotate bulk out of darts into different places so the darts are much smoother than usual. I added an extra dart into the armscye which was very effective. I was very worried when I was making the shirt as I couldn't really try it on until the very end and I was terrified it wouldn't fit -but then it did! LIKE A GLOVE !


There were a few hiccups during construction but mainly due to me skipping through the instructions and missing bits! The button band was a little narrow for my buttons and I liked the way it looked when I pinned it up so I instead just sewed giant snaps to the inside for a cleaner and less "pully" look. Buttons and the larger bust can be a bit tricky so I just avoided it. 


Main pattern adjustments  - short sleeves (I just cut them off square about the right length plus a bit and then turned them up),  FBA and I lengthened the bodice about an inch. I also put the sleeves in on the flat (partly by preference and partly as I missed the instruction to sew up the sides!) and no buttons. 


Again- I just LOVE this! The photoshoot was masterminded by my sister who enjoyed herself immensely being photographer! (EDIT - I've just noticed my collar is rucked up - it sits fine usually!)


Friday 11 March 2016

FRUMP-AN-ECTOMY

I had a bit of a revelation the other day. Not perhaps that ground breaking but surprising to me. I own quite a lot of patterns, and I rarely use any of them. Similarly I have a lot of fabric to make those patterns up, and I rarely sew with it. Now up to this point I had just assumed I was lazy. All those projects just waiting and me not being organised enough to bother. It niggled at me, made me feel a bit of a failure. Which is obviously ridiculous as I haven't failed and this is meant to be a hobby!

But perhaps its not entirely that. Perhaps it's more that I also own about a bajillion bits of clothing already. Most of which look uncannily like the patterns. I haven't made 10 extra pencil skirts because there is just no need for me to do so. Not that's not so say that making stuff you don't need isn't an excellent thing to do, but there certainly isn't much pressure.

So that's half my stash explained. I don't need it and I don't want it enough to bother making it. Not sure what I do with that knowledge now but I shall think on it.


So what about the other half?

That's mainly fear (with a decent wedge of actual laziness this time!). This is all the fabric and patterns I bought for projects that I don't feel confident to start and/or are worried will become an endless fitting nightmare that I shan't finish. This is mainly two categories: difficult fabrics, and bodice fitting.


So what should I actually be trying to sew? Clearly my hungry fabric hoarder instincts are completely off.

As I am going through a hating everything in my wardrobe phase, this seems like a good moment to re-assess. I currently feel a bit dumpy and frumpy in my clothes. I know this is just my own silliness but it happens to us all! I have no desire to be generally fashionable, I'm happy to have my own style but I think I could do with a bit of updating. Having said that a lot of current fashion seems to be even more boring than my current wardrobe so clearly I shall have to be selective!

FRUMP- AN-ECTOMY


I decided to get systematic. Which aspects of my wardrobe make me feel most like a big unfashionable lump, and what can I do to spice them up?


  • Old tired T-shirts.

PROBLEM - A lot of my tops are at least 5 if not 10 years old. They look it. They are also all the same.
SOLUTION - make more, some using my flutter sleeve t-shirt sloper that makes me feel a bit more dressed up than a standard T.
 It looks generally like this.


  • Tops bunching around the waist/leaving lines under pencil skirts

PROBLEM a lot of the aforementioned T-shirts aren't quite the right length, they ride up and bunch, or make me less sleek under clothes.
SOLUTION Make some Nettie bodysuits. This has the advantage that I already have the pattern.

Nettie Dress & bodysuit pattern // Closet Case Patterns


  • I only have T-shirts

PROBLEM: I have a large bust, so nothing fits me in a woven without substantial alterations. Which we have established puts me off. In an attempt to get round this I have previously bought very simple patterns to get the hang of it without bothering with the additional drama of sleeves, collars, buttons etc. These however aren't actually things I want to wear or make. So I didn't.
SOLUTION: just bite the bullet and make a proper shirt I actually fancy wearing. I often find simple shirts a bit dull/officey so I have selected the Bruyere from Deer and Doe. It's got enough detail that it looks like it should be fitted without being too extremely tight.

Bruyère shirt


  • Cardigans

PROBLEM I wear cardigans with everything. I am often unconvinced by how they look (a bit middle aged on my figure) and the ones I have all seem to be wrong colours somehow. But I need layers - my body temp goes all over the place all day!
SOLUTION:  this was a bit harder and required some internet research (ie looking at some high street websites to see what the cool kids are wearing).

Option a) cropped jumper / sweatshirt. I quite like these, good length on me but do lack the warmth middle ground option of an open cardigan.

I also already own Astoria from Collette's Seamwork magazine. I shall drop the neckline a bit.

Astoria

Option b) kimono tops. I love this - particularity when they are either made in plain colours, or still jazzy but simplified, like these examples.

(Dorothy Perkins)

(also Dorothy Perkins)

Again, luckily! I already own the Asaka kimono from Named. The sleeves are a little wild for everyday buts it's a good pattern (I'll save the sleeves for a dressing gown or something!


So that's the plan - we shall see if it works out!