Sunday, 31 July 2011

Alien/Ripley

Well I have been very busy with uni stuff the last few weeks and I haven't managed to finish much or get organised to get photos, but I have amde a silly papermache costume! The party's theme was Opposites, which was a bit of a poser, but I eventually decided to go as Ripley and the Alien from the Alien films. For those who haven't seen them, the people on a spaceship are all picked off by a scary alien, and Ellen Ripley, a strong willed crew member, has to fight it off, and then do so again and again in subsequent (equally good) films.

She generally looks rather bedraggled after crawling through ventilation ducts and running down corridors, and the costume part for her, combat trousers and a white vest, was very basic and straightforward (in theory anyway-I spent a horribly long time looking in charity shops for them- a bizarre lack of these items available!).

For the alien part, I decided to just make the head, out of papermache. In case anyone feels an urge to make a xenomorph head mask thing, here is how I did it. It took about 1.5 hours excluding drying time.


First I made a tube out thin card for my head, which wil act as the alien's neck. I marked roughly where my eyes and mouth would be and cut them out. I made the tube about 20cm higher than the top of my head.


I then started on the main head bit. The alien's head is curved and rounded at the ends, so to create the base of the curve I used plastic bottles. I used the large 2 litre ones, cut both ends off and slit down one side. I opened them up and made card pieces to hold them open.


I then cut three large rectangles of card, and stapled them together on a slight angle so that they make a curve, and then attached the bottles onto each end.


I put two long strips across to hold the thing in shape, and two across each end under the bottles.


To make the mouth part, I cut a lower jaw out of a folded bit of card and added a bit at the front to complete the jaw at the front. I then cut out the top jaw and stapled it on. I then attached the jaws to the bottom with masking and duct tape.


I then attached the neck to the top with duct tape, and covered it with papermache.


I then slightly ran out of time as I was going to have tea with my parents, so my lovely flatmate charlotte had to paint it for me. Luckily it just fit in the airing cupboard so it didn't take long to dry. She used a mix of poster paint and PVA so that it had a slight shine. I tend to use water based paints for costumes as they wash out of everything, though that turned out to be a bit of a drawback at the party as when I spilt my beer on it by accident the paint came off all over me and other party goers!


So here are the final costume options,


Friday, 15 July 2011

Learning to sew clothes through the blog world -a (long) list of starting points

This post is a bit of a shout out to my friend Dani, who told me that she had a sewing machine and knew how to use it, but didn’t know how to sew clothes on it. She writes a lovely blog called Gourmet Gaming, where she makes real life super tasty looking meals based on food featured in computer games. As today is her birthday, I thought I would get round to finishing a post I have been working on about how to start sewing. This is particularly sensible as I have been wrestling for days with the shifting skies skirt which continues to mess with my head despite being very simple. 
It still looks a lot like this.

I am not an expert or even intermediate, I suck at most parts of sewing, but when I started it was because I got hooked on sewing blogs and they taught me how to do so many things and inspired me to make stuff. Sewing clothes is a bit overwhelming at first and there is lot of new things to learn. Therefore I have had a glance around the web and found some good places to start.

One of the best sources of really detailed thorough tutorials for different parts of the sewing process (online that is) are sewalongs, where a clever person makes a specific garment that you can follow along with, with each step and possible alterations explained. Whilst these are obviously based on a specific pattern, the techniques can be applied to anything.  A lot of the posts I am about to reference fall into this category.

Obviously the web is a big place, and there are many talented people with amazing blogs and sites , these are just a  few. Actually quite a lot now I’ve found them all.. but hopefully this will be a suggestion of some starting points and a signpost to some amazingly talented sewers and bloggers who have certainly taught and inspired me a lot.

Tilly and the Buttons

Overall learning to sew posts-where do I start?

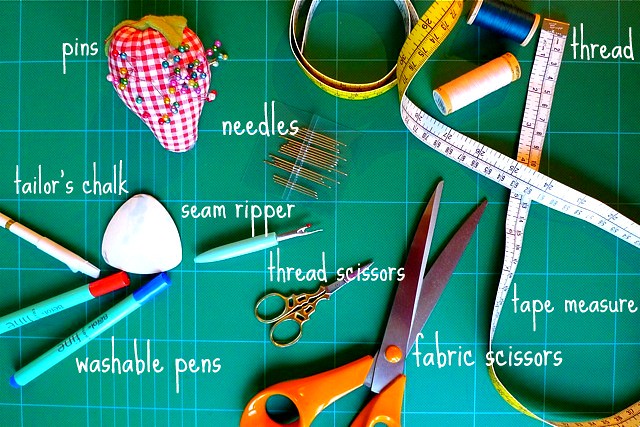
What do I need? Whilst many sewers hardly have any tools, and others have lots, it’s always useful to know what the various things do..


Making stuff from patterns
Reading and understanding dressmaking pattern envelopes 
It’s often worth making a muslin or toile (a rough run through of the pattern) to see if it fits. http://www.afashionablestitch.com/2010/buttons/sewing/toile/


Basic techniques

A Fashionable Stitch 

Seams
Seam Finishes – Generally I just do a zig zag stitch over the edges of my fabric so it doesn't fray but there are other fancier options! There are a lot of posts out there for these, a good overview here http://sewmamasew.com/blog2/2008/05/seam-finishes-simplified/
but Sunni's is probably the most comprehensive:


Sewaholic

Hemming-Frankly. I still completely suck at this! Hems can be as simple or complex as you like.
Hems have to  be marked all round so that they are level (despite the body’s lumps and bumps, and whether the fabric has stretched etc) ideally by an experienced seamstress (like your mum) but usually by a semi-willing helper with no idea what they are doing, plus its actually slightly tricky getting them straight. There are clever ways of making it easier though http://www.afashionablestitch.com/2011/buttons/sewalongs/hemming/

Sewing a bust dart


Zip. Zips are either visible or invisible  (invisible zips are sort of inside out with the visible bit of the teeth on the inside of the garment-often used on skirts) http://www.threadsmagazine.com/item/3728/sewing-in-a-zipper
Hand picked visible (hand sewn-sounds like more work and looking tatty, actually less fiddly and often looks better) http://www.threadsmagazine.com/item/5135/a-hand-picked-zipper-is-worth-the-effort

Fitting probably shouldn’t be a beginner technique, but getting the bust size wrong without knowing what is going on will put you right off sewing so it’s best to have a basic idea. Most patterns, like ready to wear clothes from shops, assume you are a B-C cup. Obviously an awful lot of us aren’t, so we need to adjust the patterns to allow either more or less space, this can a bit fiddly but is usually quite straight forward.

Full Bust Adjustment (these are all over the web and generally the same sort of method

Sewaholic for A Fashionable Stitch

Fabric

You must wash your fabric before you use it to make something (unless its dry clean only), otherwise it can shrink and it wont fit anymore once you’ve washed it. http://www.afashionablestitch.com/2011/buttons/sewalongs/pre-laundering-fabric/

Cutting fabric

Working with knits (stretchy jersey not knitting!)

Friday, 8 July 2011

Roswell Week day 2 (sort of)

OK, I have managed to photograph things so the second half of the stuff I made on the first two days will now be revealed.

Item (s) completed - Shoulder cape vest
State before Roswell Week - had pinned some bits (wrongly it turned out)
Reason for abandonment -no idea
Time spent as an UFO - about 2 weeks actively, about 6 months overall
Time used to finish - 20 minutes 
"chump" factor felt for not having done it sooner - high - this was extremely easy

I had bought the original vest from a charity shop months ago, as I loved the colours and pattern and it looked easy to fix. The vest was slightly weird in its original version, as it was a) one of those odd tops that is really wide and hangs down much further at the sides, and b) had odd shoulders where gathered flippy bits were attached at the front and back, so you had both a vest strap, and a droopy bit of jersey frill halfway down your upper arm. I felt that this was not the most flattering of garments (for anyone surely?) and so decided to fix it. 
It was a pretty simple fix. I laid over a vest I already have and cut round it to get rid of the tent like droopiness, and matched up the bottom hem (It doesn't look straight in the photos but it is!) I then just sewed the gathered bit up onto the vest straps to make more normal fluttery sleeves. What is still slightly bizarre about the vest is that the position of the straps is such that its more like a square from the top, the distance between the straps at the front and back is about the same as the distance under the arms. This means that the fluttery sleeves are actually rather large and are more like mini capes! 


So another top made, and another knit! I am not as scared as I was.

Item (s) completed - Kneely chair recover
State before Roswell Week - boring blue cover with a hole in it and several stains
Reason for abandonment -Hadn't got any fabric I wanted to cover it with.
Time spent as an UFO - about 10 years!
Time used to finish - 10 minutes!
"chump" factor felt for not having done it sooner - high - It is pathetic how long it took me to do this.

I have had my kneely chair since I was a teenager, its meant to make you sit up straight, but I frequently use it wrong-there's just so many ways to sit on it! About 10 years ago, whilst still at my parents house, someone (no one ever owned up) ripped a hole in the cover. Over the following 10 years, as it followed me to Edinburgh, and via an uni architectural studio where I sometimes slept on it (I know, it doesn't look possible but you would be surprised) it collected a number of marks and stains as I spilled chocolate, beer, glue, wax etc on it. Given that it was a boring blue to start with, it didn't look good. Ever since the hole got ripped I have been meaning to recover it, but to no avail -until now! I used the rest of the fabric from the blue chair yesterday and just stapled it all on. JOB FINALLY DONE! It looks awesome!


You can see that my rug is suffering slightly from sewing of late-really need to get the hoover out!

Thursday, 7 July 2011

Roswell Week 2 - day 1 (sort of)

OK, I'm back, the rain has returned and fun things in the sun are now much less likely to distract me!

This is a slightly incorrect post, as I did not do all these things on day 1, some were on day 2, however, as I have not been very good at taking pictures of things, some of day 1 remains undocumented. Therefore this is half the stuff I did on days 1 and 2!


Item (s) completed - Blue Chair
State before Roswell Week - boring brown chair.
Reason for abandonment -Hadn't got any fabric I wanted to cover it with.
Time spent as an UFO - about a month
Time used to finish - 10 minutes for each coat of paint, 5 minutes covering the seat
"chump" factor felt for not having done it sooner - high - this was soo easy and looks so much better!


I had a chair left in my room that used to belong to a flatmate (well he had bought it to cut up and make into crazy architectural models but then didn't need to). After he moved out it just sat around my room with piles of stuff on it (as is the way with chairs I find!) It was hidden in a corner because it wasn't very pretty-just a high backed wooden chair with a horrible plastic leather seat. I considered painting it, mainly after seeing pretty chairs on pinterest like these and these. I was going to go with white,but then I found some lovely fabric (Amy Butler - Soul Blossoms Twilight Peony in Azure) and immediately changed my mind-the chair would be bright blue like my front door (as I had plenty of paint left!)

I rejected (through laziness) any talk of sanding and priming, and just painted the thing, 2 coats later it looked amazing! I then stapled my pretty fabric to the seat (I added a layer of wadding for comfort-this meant I had to knock the seat back in with a hammer as it was too big) and VOILA!


The colour it used to be.


There is s slight follow up to this but I haven't photographed it yet.


Item (s) completed - Pattern testing - the flamingo shrug
State before Roswell Week - print off pattern printed but not assembled.
Reason for abandonment - needed to iron the jersey and then got distracted
Time spent as an UFO - only 2 weeks or so but I needed to give the designer feedback.
Time used to finish - half an hour
"chump" factor felt for not having done it sooner - high - very easy pattern, only 2 seams!

The lovely Karin of Acien-Nouveau asked via Burdastyle for some volunteers to try out her new pattern, a cute jersey shrug, so that she could see if she had scaled the sizes correctly. I had printed it off but not got round to cutting it out and sewing it. It was super easy to make, it's all one piece and only has two short seams (unless you decide to hem it). Of course, as I am incapable of following instructions I manage to mess it up by sewing one armhole shut (i really don't know what is wrong with me!). So after I had unpicked that it was done!

As I took the pictures to show Karin the fit, they are not the most flattering or cheerful shots of me I have ever taken-but the shrug is very pretty- I made it out of more of my bright pink jersey and it is very jolly and cosy.


Monday, 4 July 2011

Roswell week 2 - a slight delay!

OK, so you may have noticed I have not been doing my Roswell Week posts. I have actually finished two things, but my plans over the last week  have been somewhat sidetracked by SUMMER!. Over the last few months Edinburgh has had pretty terrible weather, and very little sunshine, even when the rest of the UK has been having a heatwave, but in the last week it has finally improved, and everyone has gone a little mad for the sunshine! Consequently there has been a lot more "leave work early and got the pub" type stuff going on which has cramped my sewing urges a little! My lovely flatmate also had a birthday so there was festivities to be had about that as well. But Roswell Week is not cancelled, oh no. I have just paused it after 1 day, and it shall be picked up again once the rain comes back.